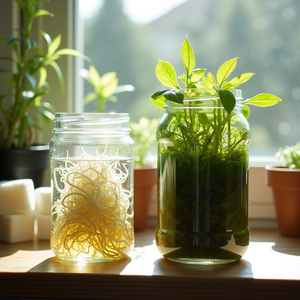
If your Kratky jar looks like pea soup and your crypts melted overnight, it is not bad luck - it is the setup. Let’s dial in a clean, silent, no-pump, desktop Kratky that keeps aquarium plants emersed, compact, and algae-free.
The problem
- Algae explosions in clear jars that turn roots brown and starve plants.
- Plant “melt” when moving from submerged to emersed growth.
- Tiny reservoirs that swing in pH and EC, causing burn or deficiency.
- Leggy, floppy growth under weak or poorly placed lights.
What is really going wrong
- Light leaks to the reservoir feed algae. Opaque containers and tight lids are non-negotiable, as noted in this guide.
- No controlled air gap. In Kratky, oxygen comes from the air gap as the solution drops - without it, roots suffocate, as described in this overview.
- Humidity shock. Submerged leaves are not cut out for dry air; they need a gradual emersed transition.
- Overdosing small jars. Tiny volumes magnify errors. Start mild, confirm with EC, and top up with plain water.
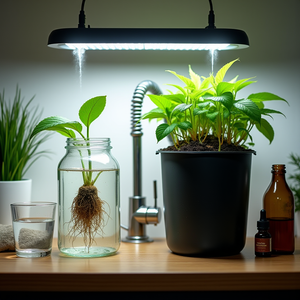
The clean, compact Kratky jar build (desktop or windowsill)
This passive hydroponics setup is designed for aquarium plants emersed or small herbs. It is silent, cheap, and beginner-friendly.
Hardware
- Jar: 300-500 ml glass or food-safe plastic. Make it opaque to prevent algae: use amber jars, stick-on blackout vinyl, or spray-paint the outside only. Blocking light to the reservoir is a proven algae control step, as noted in this guide.
- Lid: Hole sized for a 2 inch net pot. Add a neoprene collar or rockwool plug to hold cuttings.
- Sight check: A removable light-blocking dipstick or external sight tube covered with tape lets you check levels without exposing the solution to light.
Reservoir prep
- Wash, then sanitize the jar and lid. A quick rinse with 3 percent hydrogen peroxide, then fresh water, keeps bioburden down between runs.
- Fill with nutrient solution (see dosing below). Start with solution touching the net pot bottom to wet media.
- Seal light out: snug lid, cover gaps, and wrap any clear parts.
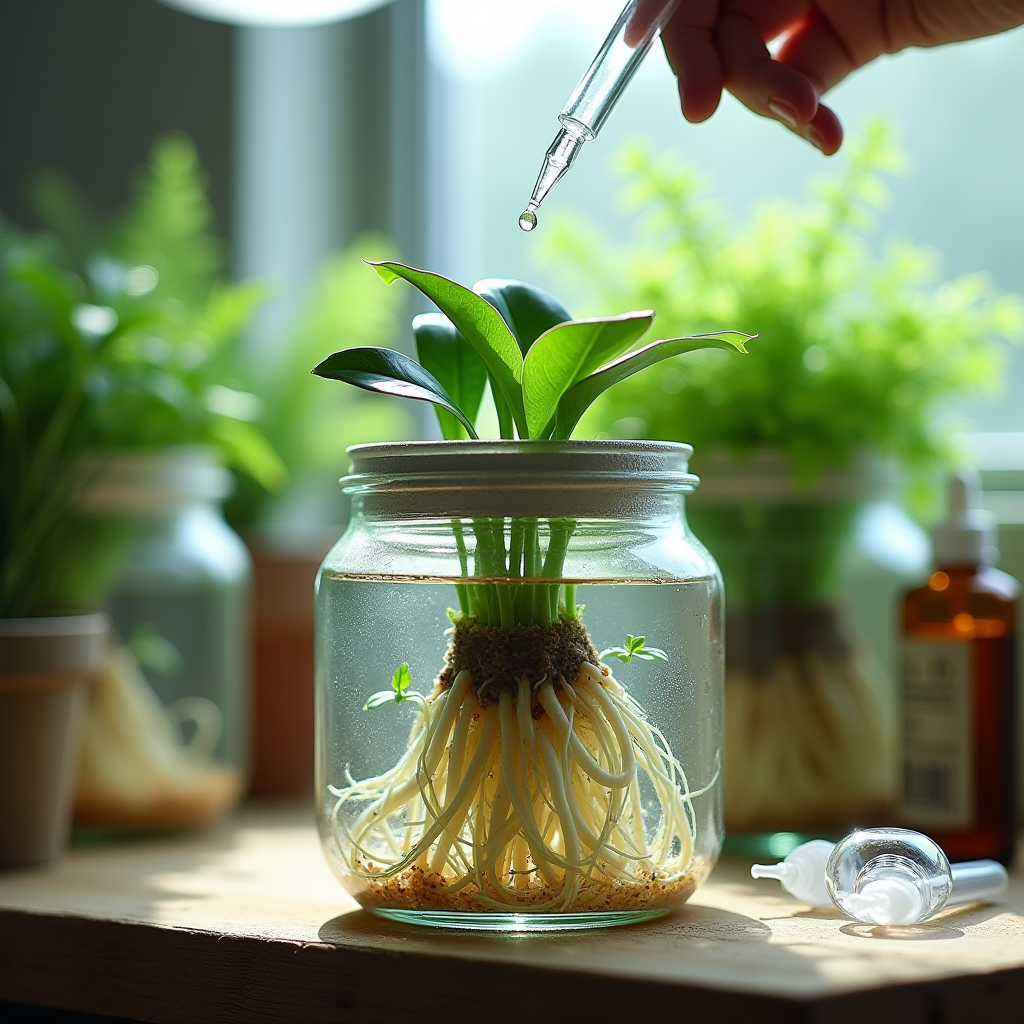
Air-gap management that works
- Week 0-1: Solution touches the net pot. As plants drink, an air gap forms naturally. That gap is the oxygen supply in Kratky systems, as explained in this overview.
- After roots reach the solution: Maintain a 1-3 cm air gap. Top up with plain water only when the gap exceeds ~3 cm. Do not refill to the net pot once roots have bridged.
Stopping algae before it starts
- Block light to everything below the lid. Paint, tape, or sleeves are your best friends. Opaque reservoirs and tight covers are standard practice to prevent algae in passive systems, as noted in this guide.
- Keep nutrients off the windowsill glass. Any light through the solution drives algae. If using a sunny sill, slide a sleeve over the jar or place it inside an opaque cachepot.
- Clean between cycles: Rinse, sanitize, and dry. Do not rely on additives to fight algae when simple light exclusion and hygiene work better.
Emersed transition without melt
Many aquarium species - Anubias, Hygrophila, Bacopa, Alternanthera, and even crypts - grow emersed beautifully, but they need a humidity ramp.
- Day 0-3: Install a clear humidity dome (cut plastic cup or bag) with 2-3 pinholes. Aim for very high humidity and bright, indirect light.
- Day 4-6: Add more holes or open a small vent. Keep leaves dry; brief morning mist if they wilt.
- Day 7-10: Start lifting the dome during the day. Remove fully by day 10-14 once new emersed leaves appear.
- Keep the dome off in direct sun - trapped heat cooks plants and accelerates algae.
Right-size nutrient dosing for tiny jars
In small reservoirs, less is more. The Kratky method depends on getting the starting solution right, as emphasized in this beginner guide.
Targets
- pH: 5.8-6.2 for most herbs and aquarium plants emersed. A slightly acidic range improves nutrient uptake in hydroponics, as noted in this guide.
- EC (mS/cm): aquarium plants emersed 0.6-1.0; small-leaf herbs 1.0-1.4. Start low and increase only if growth is pale or slow. EC is your guide to concentration, as covered in this explainer.
Accurate dosing method
- Mix with clean, low-mineral water (source TDS below ~200 ppm when possible).
- If you have an EC pen, dose to target EC. If not, start at 25-50 percent of the bottle’s seedling/veg recommendation for hydroponics, then watch leaves.
- For a 500 ml jar: if the label calls for 2 ml per liter, use 0.5-1.0 ml total in 500 ml (start at the low end for aquarium plants emersed). Use a syringe or pipette for 0.1 ml precision.
- Top-ups: Add plain water only to maintain the air gap. Do not keep adding nutrients - that spikes EC.
- Mid-cycle boosts: If new leaves are pale and EC is below target, add 0.1 ml nutrient, stir, recheck.
- Always recheck and adjust pH after dosing. Affordable kits work, as noted in this guide.
Lighting for compact, desktop growth
- Photoperiod: 12-14 hours for most aquarium plants emersed and common herbs. The Kratky method thrives with consistent light, as overviewed in this UF/IFAS explainer.
- Fixture: A 4000-6500K LED desk light placed 15-25 cm above the canopy keeps growth tight. If using a bright window, buffer midday sun with a sheer curtain to limit heat and algae.
- Placement: Keep light off the reservoir. Angle the lamp to the foliage, not the jar.
Troubleshooting quick hits
- Green water or algae on glass: Improve blackout, shorten photoperiod by 1-2 hours, clean and reset. Opaque reservoirs and tight lids reduce algae, as noted in this guide.
- Melted leaves: Slow the dome taper, reduce light intensity, keep leaves dry, and wait for new emersed growth.
- Pale new growth: EC likely low. Add 0.1 ml nutrient, retest EC, and watch for 3-5 days.
- Burned tips or salt crust: EC too high or water evaporated. Top up with plain water to the target air gap and lower future starting EC.
- Brown, smelly roots: Air gap missing or solution overheated. Lower the nutrient level to restore a 1-3 cm gap and move the jar out of direct sun. Kratky depends on that air gap, as described in this overview.
Why this works
The Kratky method is designed to be non-circulating and pump-free. As the plant consumes solution, the falling level creates the oxygenated zone roots need, which is why a good starting fill, a controlled air gap, and light-tight reservoirs are the winning combo for passive hydroponics. For a clear primer on Kratky fundamentals, see this overview and this guide. For beginner-focused setup tips and nutrient management basics, see this article and this explainer.
Lock in these fundamentals and your small-space Kratky jars will stay clean, quiet, and productive - perfect for aquarium plants emersed or a desktop herb cut farm. Kratky method for beginners, done right.