Keep DWC Nutrients Cool on a Budget: Chest Freezer Heat‑Exchanger Sizing, Pumps, and Food‑Safe Materials
“If your reservoir is clear and your EC is perfect, but your roots keep going brown, the problem is not the nutrient brand. It is your temperature.”
Warm nutrient solution is a silent yield killer in deep water culture. Once your reservoir creeps past about 22–24°C, dissolved oxygen drops, roots suffocate, and pathogens get the upper hand. You can run the cleanest salts on the planet and still lose crops.
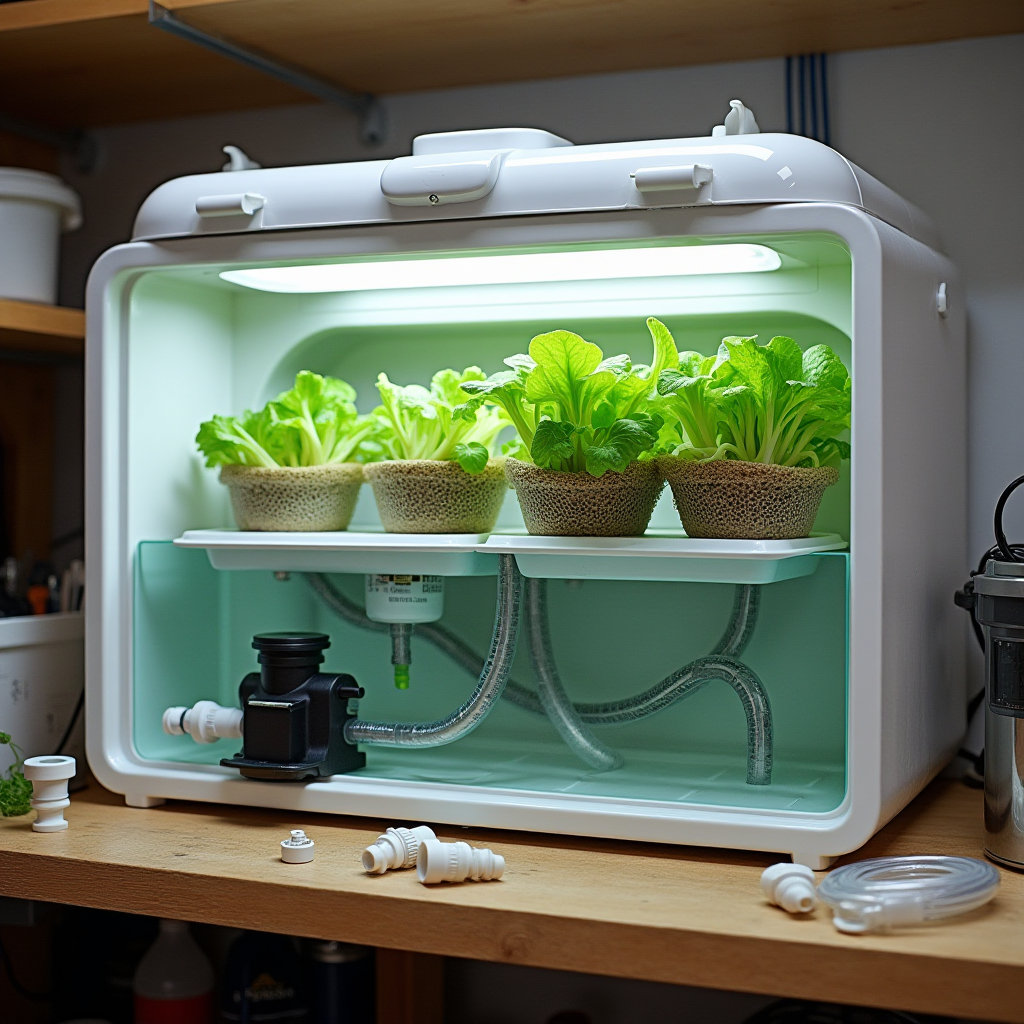
Commercial chillers work, but at $800–$1,500, they are out of reach for a lot of home and small‑scale growers. The good news: you can get industrial‑style root‑zone control by turning a chest freezer into a glycol loop heat‑exchanger and running your nutrients through a stainless coil.
This guide takes that idea from “cool Reddit project” to a repeatable, food‑safe design. We will walk through sizing the system in BTU and liters, choosing a pump, picking stainless coils and plumbing, condensation control, sanitation, controller logic, and realistic power draw, all aimed at holding your DWC in the 18–22°C sweet spot.
1. Common mistakes when cooling DWC on a budget
1.1 Relying on frozen bottles and ice blocks
Most growers start here. You freeze a few bottles, toss them in the reservoir, and watch the temperature drop for an hour or two. Then it climbs back up, your dissolved oxygen crashes, and you are back where you started.
Problems with the ice‑bottle approach:
- No control: Temperature swings several degrees up and down, stressing roots.
- Labor‑heavy: You are married to your freezer, especially during heatwaves.
- Localized chilling: Roots next to the ice go very cold while the rest of the reservoir stays warm.
1.2 Oversizing or undersizing the chest freezer
Grabbing “any old freezer” and hoping for the best is a common trap. If the freezer is too small for the heat load from your grow, it will run constantly and still fail to keep up. Too large and you are paying for capacity and standby losses you do not need.
1.3 Using the wrong materials in the loop
Some DIY builds run nutrient solution through copper coils or non‑food plastics because they are cheap or easy to find. That is a long‑term mistake. Copper can leach into your nutrient and become phytotoxic, and many plumbing plastics are not designed for food contact or long‑term nutrient exposure.
1.4 Ignoring condensation and insulation
Cool a bare plastic tote of nutrients in a warm room and the outside surface will sweat like crazy. That condensation leads to slippery floors, mold risk, and wasted energy as your system constantly re‑absorbs heat from the room.
1.5 Treating temperature separately from EC and pH
Root‑zone temperature is tightly linked to nutrient uptake. As outlined in hydroponic overviews from Britannica and Oklahoma State University Extension, plants depend on balanced water chemistry and aeration, not just NPK. Chilling the water but letting EC and pH drift turns one problem into three.

2. Why these mistakes happen (and how the physics works)
2.1 Underestimating how much heat is in a reservoir
To fix the problem, you have to respect the numbers. Water has a high specific heat capacity: about 4.18 kJ/kg·°C. That means a 100 L reservoir (about 100 kg of water) needs roughly 418 kJ of heat removed for every 1°C you want to drop.
For growers running multiple buckets on a shared reservoir, plus pumps, lights, and a warm grow room, that heat adds up fast. Short, manual cooling bursts from ice are not enough to keep a 24‑hour hydroponic system in range.
2.2 Confusing air temperature with root‑zone temperature
Growers often track air temperatures closely and assume the reservoir is similar. In reality, water lags behind air changes and can run several degrees warmer due to pump heat, radiant heat from lights, and warm return lines. As noted in Bluelab's beginner guide, the root zone often experiences very different conditions than the canopy.
2.3 Choosing materials by price instead of chemistry
Using “whatever tubing is cheap” is fine for a temporary test rig, but not for long‑term systems where nutrient solution will be in constant contact with the plumbing. You need materials that are both food‑safe and resistant to slightly acidic, mineral‑rich water.
2.4 Forgetting that cold surfaces attract moisture
Any surface colder than the surrounding air's dew point will sweat. A chilled reservoir or cold lines running from your chest freezer back to the DWC tote are giant condensation magnets. If you do not insulate them, you are constantly paying to re‑cool water that just sucked up heat from the room.
2.5 Treating cooling as separate from system design
Hydroponics is a systems game. As described in broad hydroponic overviews such as Oklahoma State University's hydroponics fact sheet and Britannica's hydroponics entry, success comes from coordinating environment, nutrient solution, and plant genetics. Root‑zone temperature, oxygen, EC, pH, and sanitation all interact. If you drop in a cooler but ignore plumbing layout, biofilm, and control logic, you will chase failures instead of yields.

3. How to fix it: design a chest‑freezer heat‑exchanger that holds 18–22°C
3.1 Target setpoints for DWC root‑zone temperature
For most leafy greens, herbs, and even many fruiting crops in DWC, aim to keep the nutrient solution between 18 and 22°C. Below about 16°C, growth slows noticeably. Above 22–24°C, oxygen drops fast and root pathogens get comfortable.
In practice, 19–21°C is a good control band. That gives you a bit of buffer if the room spikes and still keeps dissolved oxygen high without over‑chilling.
3.2 Sizing the system: BTU, liters, and heat load
You do not need to be an HVAC engineer, but you should have rough numbers.
Step 1: Work out reservoir volume
- Single DWC tote: just use the working volume (for example, 80 L in a 100 L tote).
- Multi‑bucket DWC with a shared reservoir: add up the water in all buckets plus the main reservoir.
Example: 4 buckets at 20 L each plus a 60 L control reservoir gives you around 140 L total.
Step 2: Estimate the temperature drop you need
- Measure actual reservoir temperature over a day without cooling.
- Take the worst‑case: maybe it peaks at 27°C in a hot garage.
- Target 20°C, so you need a 7°C drop.
Step 3: Estimate the cooling requirement
Use the simple relationship:
- Q (kJ) ≈ mass of water (kg) × 4.18 × ΔT (°C)
For 140 L (≈140 kg) and a 7°C drop:
- Q ≈ 140 × 4.18 × 7 ≈ 4090 kJ
Spread that over, say, 2 hours during the hottest part of the day:
- 4090 kJ / 2 h ≈ 2045 kJ/h
- 1 watt ≈ 3.6 kJ/h → 2045 / 3.6 ≈ 568 W of cooling for that period
- 568 W is roughly 1938 BTU/h
That is a rough maximum. In reality, the reservoir will be gaining and losing heat constantly, but this gets you in the ballpark. Many 100–200 L chest freezers can deliver several hundred watts of cooling, which is sufficient if you insulate and do not oversize the heat load.
3.3 Choosing the chest freezer
- Volume: For 50–200 L of nutrients, a 100–200 L chest freezer is usually plenty for your cold bath.
- Condition: Look for a good lid seal and a working thermostat. Used freezers are fine if they pull down to at least –10°C when empty.
- Location: Keep it in a reasonably cool, ventilated spot. A freezer in a 35°C shed has to work much harder than one in a 24°C basement.
Do not drill the walls unless you know exactly where the refrigerant lines are. Instead, run hoses through the lid gasket or an existing drain port.
3.4 Building the cold bath
The cold bath is the liquid in the freezer that cools your stainless coil. You have two realistic options:
- Water + propylene glycol: Non‑toxic antifreeze, safer around food systems than automotive ethylene glycol. Good for running the bath just below 0°C without freezing solid.
- Water + salt (brine): Cheaper but more corrosive to metals and the freezer interior. If you use brine, keep the coil stainless and avoid bare steel fittings.
For a DIY hydroponic chiller, propylene glycol mix at 20–40% by volume is a solid choice. Run the bath between about –2°C and +5°C. You do not need deep freezer temperatures; you just want a consistent cold mass.
3.5 Stainless coil selection and sizing
The coil is your actual heat‑exchanger interface with the nutrient solution.
Material:
- Use 304 or 316 stainless‑steel tubing rated for potable water.
- Avoid copper in direct contact with nutrient solution. It can leach and harm plants.
Diameter:
- 6–10 mm (¼–⅜ inch) internal diameter is the sweet spot for hobby DWC systems.
- Smaller diameters increase resistance and can strain small pumps; larger diameters reduce heat transfer per unit length.
Length:
- For 50–100 L reservoirs, start with around 10 m of ⅜ inch stainless coil.
- For 100–200 L, 15–20 m is more realistic, especially in hot climates.
Err on the side of more coil. Extra surface area does not hurt; it just lets you reach target temperature with less compressor runtime.
3.6 Pump selection and plumbing layout
You have two fluid loops: the cold bath and the nutrient circuit.
Nutrient loop:
- Use a small food‑safe or aquarium‑rated pump.
- Flow target: 2–4 reservoir turnovers per hour through the coil.
- Example: For a 100 L system, aim for 400–600 L/h after accounting for coil resistance.
- Use opaque PVC, PE, or silicone tubing; keep runs as short and direct as possible.
Plumbing is simple: reservoir → pump → coil inlet → coil outlet → reservoir. Put the pump at or below reservoir level to avoid priming headaches.
Cold bath loop (optional but recommended):
- Drop a tiny pump or airstone into the glycol bath to circulate fluid around the coil.
- This avoids “cold shells” and keeps the entire bath at a uniform temperature.
3.7 Temperature controllers and logic
You want the probe in the nutrient reservoir, not the freezer. The plants care about root‑zone temperature, not bath temperature.
Simple control strategy:
- Set a digital temperature controller to turn the freezer on at, say, 21°C and off at 19°C based on reservoir probe.
- Run the nutrient pump 24/7 so water is always circulating through the coil.
This keeps things simple but can cycle the compressor more often.
Refined strategy:
- Let the freezer's internal thermostat hold the bath at a setpoint (for example, –2 to 0°C).
- Use an external controller on the nutrient pump instead: turn the pump on when the reservoir reaches 21°C and off at 19°C.
This reduces compressor cycling and lets the freezer act as a cold “battery.”

3.8 Fail‑safes you actually need
- GFCI / RCD protection: All circuits near water should be on ground‑fault protection.
- High‑ and low‑temperature alarms: Simple Wi‑Fi or standalone alarms that alert you if the reservoir leaves 16–24°C.
- Overflow planning: Ensure return lines cannot siphon the reservoir dry into the freezer or onto the floor if something disconnects.
- Backup aeration: If the freezer fails on a hot day, extra air stones help buy you time by boosting dissolved oxygen.
3.9 Insulation and condensation control
Every watt you do not let into the system is a watt the freezer does not have to pull back out.
- Wrap reservoirs in foam board, neoprene, or even camping mats.
- Use tight lids and light‑blocking net‑pot covers.
- Insulate supply and return lines from the freezer with pipe insulation or split foam tubing.
- Place a tray under the reservoir if you are in a humid room to catch any condensation and keep floors safe.
3.10 Sanitation in a chilled system
Cool water slows pathogens but does not sterilize anything. You still need solid hygiene:
- Bleach or peroxide wash between runs.
- Scrub or soak the stainless coil periodically to strip biofilm.
- Avoid organic debris and dead roots collecting in the reservoir or coil circuit.
Clean systems plus cool nutrient solution makes it much harder for Pythium and other root diseases to get established.

4. What to watch long‑term: energy, EC/pH stability, and system health
4.1 Realistic energy use and how to keep it sane
A chest freezer plus a small pump is usually more efficient than a similar‑capacity commercial chiller, especially when you factor in heavy insulation. But do not guess: measure.
- Use a plug‑in energy meter on the freezer and pump.
- Track kWh over a week in hot weather with your preferred setpoints.
- Adjust reservoir insulation, setpoints, and hysteresis to see what actually saves energy without cooking your roots.
Many growers find that once dialed, the freezer only runs intermittently, because the cold bath and insulated reservoir act as a thermal battery.
4.2 EC and pH behavior in a cooled reservoir
Cooler nutrient solution tends to drift more slowly, but you still need to stay on top of it. As highlighted by Bluelab, managing pH and EC is fundamental to avoiding nutrient lockout.
- EC: Check at least a few times per week. Top up with plain water, then re‑adjust nutrient strength.
- pH: For most DWC, aim around 5.8–6.0. Check daily in smaller systems or every couple of days in large volumes.
- Be aware that some bio‑additives behave differently at lower temperatures. Watch roots and leaf color rather than relying only on the label.
4.3 Root health benchmarks
How do you know the system is working beyond “the temp looks good”?
- Roots: White to cream, firm, no foul smell.
- Growth rate: Strong vegetative push without random midday wilting.
- Reservoir clarity: Nutrient solution looks clean, not cloudy or slimy.
- Dissolved oxygen: If you have a DO meter, aim for 6–8 mg/L or higher at your operating temperature.
4.4 Maintenance schedule for the chiller loop
- Weekly: Visual check for condensation, leaks, ice buildup in the bath, odd noises from the freezer or pumps.
- Per run (every crop cycle): Drain and clean the nutrient reservoir, coil, and lines. Inspect wiring and controllers.
- Annually: Replace any hard or cloudy silicone tubing, refresh the glycol mix, and clean dust from the freezer coils and compressor area.
4.5 Adapting the design to Kratky and other systems
While this guide focuses on DWC, the same chest‑freezer heat‑exchanger concept helps any system where nutrient temperature matters: NFT, recirculating drip, and even pre‑cooling solution for Kratky jars or buckets.
- Use the chilled reservoir as your mixing tank for top‑offs and solution changes.
- Pre‑cool make‑up water before filling Kratky containers.
- For small passive setups, combine chilled solution with blackout sleeves and reflective lids to keep heat and algae out.
If you keep the root zone in the 18–22°C band, maintain EC and pH, and stay ahead of biofilm, you will see the difference in root color, growth rate, and overall resilience. That is the payoff: a low‑cost, chest‑freezer‑based chiller that actually behaves like a professional system.
As an Amazon Associate, I earn from qualifying purchases.